![Contact details [go to contact page]](shared/images/contact.png)
My Work
Click the links below to view a couple of past jobs I've worked on. I'm not afraid to show you in detail how I do most of my jobs, my camera is never far away from the workbench!
Keep up to date with what's on the workbench by Liking me on Facebook or Following me on Twitter
Restoring and respraying a 1966 Fender Mustang
Here's each step I took when I (lovingly) restored this vintage Fender Mustang, It's a complete strip down to the bare wood and then refinished in Nitrocellulose Fiesta red
De-fretting a Bass Guitar
Step-by-step photos of turning a fretted bass fretless!
Making a custom scratchplate
Here's how I made this one off pickguard for a Yamaha BB bass step by step
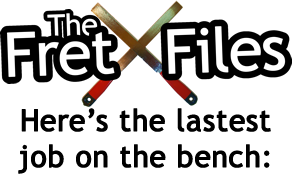
Re-wiring a 1970s Gibson ES 355 - Through the F holes!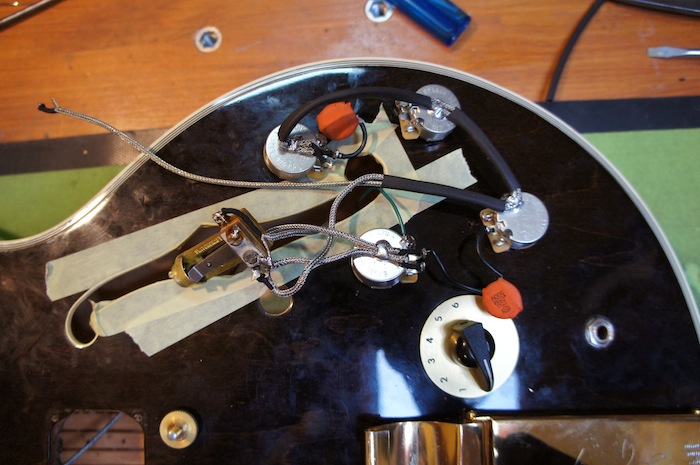
Ever wondered how the wiring is done on a semi hollow guitar like the ES335 or in this case a Gibson ES355?
Musicmaster Truss rod replacement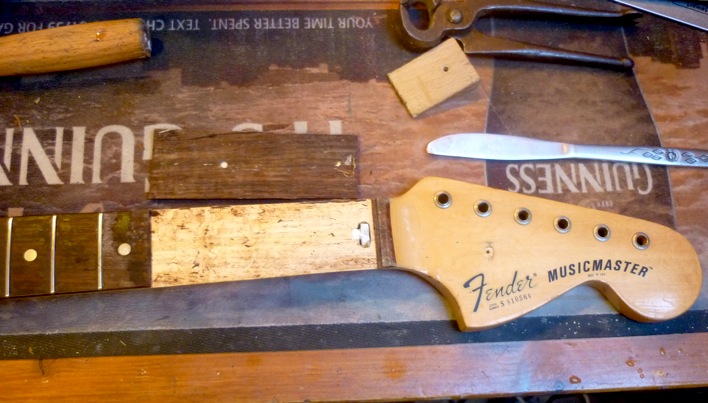
Here's how I repaired a 1978 Fender Musicmaster's broken truss rod. Major guitar surgery!
Making a new bone nut
Here's me making a new bone nut for this lovely Stonebridge acoustic from scratch
Doing a fret dress on a Fender Strat
Here's what goes into a fret dress step by step. The fret dress is included in one of my Advanced Setups. This Strat's frets were in bad shape!
Making a new acoustic bridge saddle from bone
I take all these steps when making a new bone saddle for acoustic guitars - all bespoke made!
Respraying and restoring a Kramer
Alot of work goes into a guitar respray, mostly sanding! See a full walkthrough here
Acoustic guitar headstock break repair
A real nasty headstock break on this acoustic. Heads fall off guitars and damage in so many different ways, these 2 halves werent easy to get back together!
Much More!
Hover over pictures to read individual captions, Click "more text" to read the job outline for each of these guitars
'77 Hardtail Strat with a maple fretboard refret
-
This Lovely old '77 Strat has been in need of a re-fret for some years. The Frets in it are really low and pitted not to mention that a considerable amount of the fret is buried by some really thick lacquer on the fingerboard.
Click to show/hide description
This guitar is a really strange one partially due to being made in Fender's CBS cutbacks era. Half of the finish is Polyurethane which is a tougher finish which doesn't change colour over time. nitrocellulose however does, nitro is Fender and Gibson's and many classic cars finish of choice.
The headstock face is finished in nitrocellulose apparently because the poly' finish would react with the Fender decal. The body was also finished with poly' but then coated over with nitro! there's a patch on the back where the weaker nitro has worn off.
This guitar weighs a tonne being solid ash. It also features a fixed bridge which I like but undoubtedly gives it a different sound to a normal Strat tremolo. For better or worse is debatable.
Job List:
- Score fret edges
- Remove frets (By hammering sideways!)
- Remove polyurethane from fingerboard
- Precision flatten neck
- Touch up radius of the neck (7 1/4")
- Clean fret slots
- Clean fret slots again
- Glue and hammer new frets in of a slightly taller gauge
- Clean up fret end
- Dress fret ends
- Precision level frets
- Re- Lacquer fingerboard with Nitrocellulose Lacquer
- Scrape and Polish frets
- Set guitar up
- Have a lie down
Mandolin Neck Reset
-
This mandolin was the victim of shipping damage!
The neck joint had been split but not detached, looks like one sudden impact had done it. The paintwork was all that was holding the neck on!
I want more info!
Job list:
- Remove neck
- clean up neck joint pocket
- check and re-glue neck
- clean up excess glue
- fill cracks
- repair the finish around the affected area
- set up for an easy playing action!
Acoustic Guitar Neck Reset
-
This poor old Tanglewood dreadnaught's neck angle is wrong. It looks as though the neck joint has become weakened at some point and allowed it to tilt forward as the strings pull it.
I was promised more words!
It is a 12 string so there's that extra pressure to cave in from the strings.
Because the neck's geometry is now wrong the string height is impossible to get nice and low. there just isn't enough height you can take off the bridge.
The neck pocket has to be separated and the angle re-adjusted then re-glued and setup.
Job list:
> measure body top deflection
> measure how much the neck angle has dipped
> Remove "tongue" - the frets over the guitar body
> Steam neck joint
> Let settle and dry out
> Clean neck pocket
> Correct angle by carefully removing timber according to the measurements I took earlier
> Re-Glue and clamp
> Clean up excess and run out glue
> Touch up finish If needed
> Re-setup guitar
> Play!
Washburn N4 Nuno Bettencourt Model Truss rod replacement!
-
There was no way around it this truss rod had to go!
Whoa there, tell me more!
The adjustment nut had stripped meaning you couldn't adjust the rod.
Normally, it's just a matter of extracting the old adjustment nut and fitting a new one. This wasnt possible on this guitar.
The truss rod was an odd design of dual truss rod which worked like a turnbuckle. The whole rod needed to spin when adjusted and each end of the rod was threaded - one with a clockwise thread the other anti clockwise.
The adjustment nut was brazed onto the threaded rod.
Here's the process:
>Remove ebony fingerboard
>Remove maple fillet
>Extract knackered truss rod
>Clean out channel
>Modify anchor points for new single action truss rod
>Fit new single action truss rod
>Cut a 1 piece maple fillet with correct curve
>Re-glue fillet
>Level excess glue
>Re-glue fingerboard
>Glue cleanup/finish work
>Full fret dress
>Finally re assemble guitar and setup!
>Play!
Custom Build S1 Strat body nitro paint job
-
Jim at Chick Revel Guitars has been making this S1 Strat body for his customer. He's shipped the body to me for a full fender style big, thick, strong and glossy finish.
Click for description
The body is made of solid alder and has H-S-S routing.
Job List:
> Prepare body
> Seal timber
> Check for imperfections
> Flatten
> Double check for imperfections!
> Apply colour coats x3 until completely opaque
> Flatten and remove any imperfections as they develop
> Apply clear gloss coats for shine and strength x10
> Final flatten
> Buff with coarse compound
> Buff with fine compound
> Hand buff with swirl remover
> Carnauba Wax polish
> Pose for loads of photos
